DIY Insect Collecting: Pan and Bait Traps
Traps are an easy, inexpensive way to collect and catch insects.
A few weeks ago we showed you how to make a piece of insect collecting equipment called a beat sheet. For this post, we’re going to add pan traps and baited traps to your DIY collecting tools. Pan traps (colored bowls filled with liquid) lure in insects that are attracted to different colors. Baited traps can hold an endless variety of foods that insects want to eat.
Where should I set my traps?
When you set out traps, remember that location can be key! A great place for these traps is along the periphery of your backyard, or the area where a garden or shrubbery meets the grass. If you live near a wooded area, try setting the traps out at the edge of the trees. If you have a veggie garden, set a few traps in and around your plants. You might find out what’s been chewing on your zucchini!
Pan Traps

You’ll catch lots of different insects using yellow pan traps. We bet you’ll catch some parasitoid wasps!
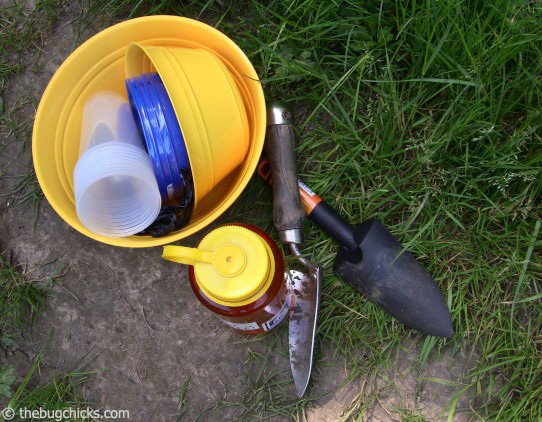
What you need:
- Solid color plastic bowls - Soap (liquid works best and biodegradable is preferable!) - Water
1. Pick your bowl color and select a trap location.
It might sound strange to specify bowl color, but different insects are attracted to different colors. Yellow is very popular in the insect world – but don’t forget blue, red and white! With yellow traps you can expect to see a greater diversity of insects, as most day-flying insects are attracted to the color yellow. You can expect to find lots of hymneopterans (bees, ants and wasps) in the yellow traps along with aphids and other sucking insects. There are fewer insects that are attracted to blue traps, but you’ll get a lot of them because the insects that like blue REALLY like it. You’ll collect more types of insects if you go with different colors!
2. Put about two inches of water in the bottom of the bowl and add a few drops of liquid soap.
To keep the insects in the bowl, adding soap is a must. The soap breaks the surface tension of the water, so when the insect lands in the trap it can’t crawl or fly back out again. We like to use Dr. Bronner’s liquid soap because it doesn’t have harmful chemicals in it.
Compare & Contrast! A fun experiment is to place different colored bowls right next to each other and compare what you find in each! Make up a little data sheet and compare: # of different kinds (bees. flies, etc.) in each bowl = diversity, # of different species = diversity, amount of same species in each bowl = abundance. Which color had the greatest diversity? Which color has the highest abundance?
NOTE: If you do not want to kill insects, do not use pan traps! Pan traps are great to use if you’re planning on making a pinned insect collection, because these traps kill the insects.
Baited Traps
Baited traps are great tools for observing insects. Watching their complex mouthparts as they eat is an incredible experience.
What you’ll need:
- Plastic containers (yoghurt cups, soup takeout cartons) - Small amount of fruit or raw hamburger - A cover for the bowls (optional)
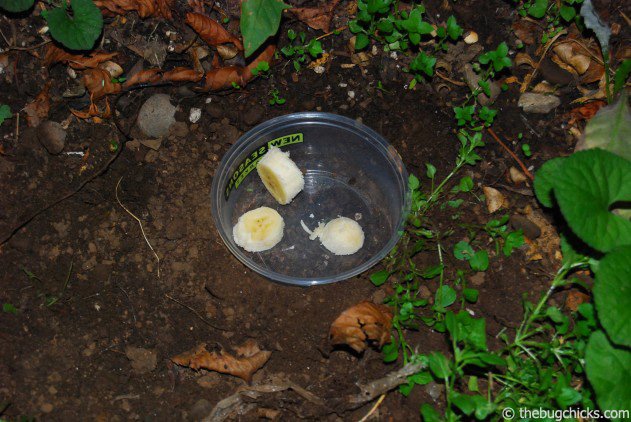
1. Place the bowls on or in the ground.
Baited traps can be used in a couple of ways. You can use a shallow dish directly on the ground, or you can use a deeper container that you set into the ground so the top is even with the ground around it. (Simply laying pieces of bait on the ground and checking on them periodically works too. Many a grad school entomologist has whiled away the summer nights with a deck chair, baited trap and frosty beverage.)
2. The Bait
Baiting traps can be very simple. Some people just plop the bait right down in the cup so that insects will fall in and have something to eat. Other people will entice insects by placing the bait into a mesh bag that hangs from a skewer lying across the opening to the trap. The mesh bag is suspended and the insects don’t get to munch on it. It’s up to you.
NOTE: Use overripe fruit. Blackened bananas, watermelon, papaya. Try different baits and see what works! Carnivorous insects, like tiger beetles, love raw hamburger. Just take off a couple little chunks (about quarter-sized should be good) and place them in the bottom of the trap.
3. Cover the traps.
Due to the almost universal appeal of raw meat to scavenging animals (raccoons, opossums – we’re talking to you…) this part might be a necessity. Using a kind of cover for the traps, especially the ones baited with meat, helps to keep non-arthropod wildlife from stealing your bait. You’ll want to use something with big enough holes for insects to pass through, but small enough to keep out other animals. If you have chicken wire, or something similar, you can create a small cone with it, and place it over the trap. If it looks like rain, you can take the lid of your plastic container and position it a few inches above the bowl with kabob skewers. You don’t want raw meat soup!
Take the kids on a midnight safari! There are still a couple of weeks before kids go back to school. A great end-of-summer activity is to set these traps around your backyard. Lay them out in the late afternoon, and in the middle of the night – between midnight and 2 a.m. – wake the kids and go check the traps! There’s nothing cooler than experiencing your backyard in the middle of the night. This is an exciting expedition for kids, and will give them something special to talk about in science class this upcoming fall.
Happy trapping! Let us know what you find!